Overview
Windows 10 Fall Creator’s Update officially introduced the Windows Subsystem for Linux. Unlike the simple BASH shell support in previous versions, this is an actual entire Linux system. This article will describe how to interact with the Windows Subsystem for Linux using Xmanager. Installation of the WSL has been covered in a previous blog post which is linked below. (If you know what you’re doing and only want the quick step-by-steps, scroll down to Basic Step-by-Step Guide near the bottom)
This article will hit the following topics:
- Installing the Windows Subsystem for Linux (WSL)
- Installing and Configuring the XDMCP Daemon
- Connecting with Xmanager XDMCP
- Connecting with Xmanager’s Secure XDMCP
- Basic Step-by-Step Guide
Installing the Windows Subsystem for Linux (WSL)
Please refer to our previous blog post related to the installation of WSL here: http://blog.netsarang.com/1884/using-the-linux-subsystem-in-windows-10/
Also, you can refer to Microsoft’s guide to installing WSL here: https://docs.microsoft.com/en-us/windows/wsl/install-win10
Installing and Configuring the XDMCP Daemon
For the sake of this article, we will be using Ubuntu as the Windows Subsystem of Linux. The most recent version of Ubuntu registered with Microsoft at the time this article was written is Ubuntu 18.04 LTS.
- Installing lightdm
test@DESKTOP-B38MLS1:~$ sudo apt-get update && sudo apt install lightdm
- Configuring the lightdm daemon
By default, the XDMCP daemon is set to run the local X server(:0). However, WSL is unable to run the local X server, and therefore you must not run the local X server upon initial setup.
Edit the /etc/lightdm/lightdm.conf file. If the file does not exist, create it.
test@DESKTOP-B38MLS1:~$ sudo vi /etc/lightdm/lightdm.conf
Make the following changes:
[LightDM]
start-default-seat=false

[XDMCPServer]
enabled=true
port=177
- Installing the user desktop environment
Since Ubuntu 12.10, Ubuntu’s Gnome-based default user environment, Ubuntu-desktop, utilizes hardware directly for graphic rendering. So if you connect remotely with Xmanager, the connection may fail or the connection will be slow. (Please refer to our FAQ here for more info: Ubuntu 18.04, 18.10, 19.04, 20.04 XDMCP Configuration))
Instead, install the Xmanager compatible xubuntu-desktop:
test@DESKTOP-B38MLS1:~$ sudo apt install xubuntu-desktop
- Running the lightdm daemon
test@DESKTOP-B38MLS1:~$ sudo service dbus start
test@DESKTOP-B38MLS1:~$ sudo /etc/init.d/lightdm start&
Connecting with Xmanager XDMCP
If you made all the necessary configurations and have run the lightdm daemon, Xmanager makes it easy to connect via XDMCP.
- Open Xmanager
Xmanager’s Dynamic Search should automatically search for and make available the local WSL system under the XDMCP tab.

- Connect to the Windows Subsystem for Linux
You can either double click the icon shown in the above picture or you can enter the localhost or the WSL Windows external IP address (192.168.11.131) into the address bar and press Enter. You should be prompted to enter your credentials. Enter your credentials and then you’re in!

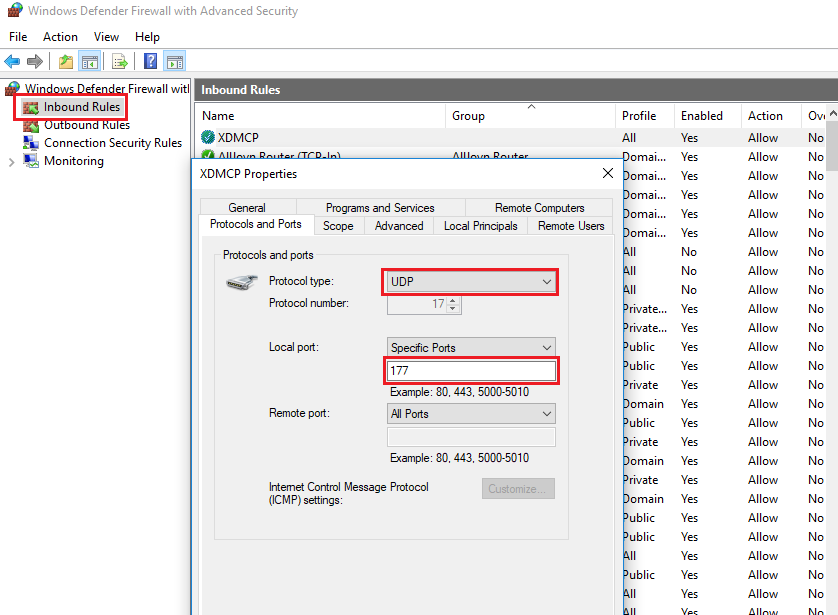
- Set up Windows for remote WSL access
If you want to access the WSL from a different PC, you’ll need to make some adjustments to the firewall on the PC on which the WSL is installed. You must allow for UDP 177.
The above guide is for connections where the remote server’s (in this case, WSL) X applications connect directly via TCP with the PC on which Xmanager is installed. This type of connection may not be possible if the PC on which Xmanager is installed is restricted by a firewall or if the network configuration prevents direct external connections. In this case, you’ll need to use Xmanager’s Secure XDMCP.
Connecting with Xmanager’s Secure XDMCP
XDMCP is inherently insecure as your traffic is not encrypted. Secure XDMCP solves this issue by moving X packets via SSH Tunneling. Another advantage of Secure XDMCP is that it allows you to access Xmanager installed PCs that are behind firewalls or private network configurations. The following guide will show you how to access the Windows Subsystem for Linux with Secure XDMCP.
- Open Xmanager and initiate a new XDMCP session
- Set up Session Properties
Select Secure XDMCP as the connection method and enter the IP address of the PC where the WSL is installed. Save the session.

- Initiate the Secure XDMCP session you have created.
- Proceed with the SSH Authentication
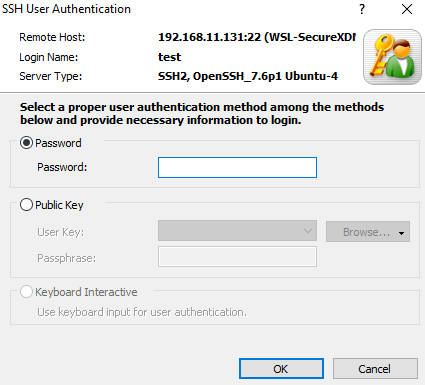
- Login
The XDMCP login screen should appear. At this point X11 forwarding, an SSH secure connection, is already in effect.

- Confirm your connection to the WSL
After logging in, check the DISPLAY. You can confirm that instead of being connected to the IP address of the PC on which Xmanager is installed, you are connected to the Windows Subsystem of Linux itself.

Basic Step-by-Step Guide
This guide is for users who do not require all the information above and only want the barebone steps for connecting to the Windows Subsystem of Linux using Xmanager and XDMCP.
- Install the Windows Subsystem of Linux and configure SSH
http://blog.netsarang.com/1884/using-the-linux-subsystem-in-windows-10/
- Set lightdm as the XDMCP Daemon
test@DESKTOP-B38MLS1:~$ sudo apt-get update && sudo apt install lightdm
- Configure the lightdm daemon
test@DESKTOP-B38MLS1:~$ sudo vi /etc/lightdm/lightdm.conf
[LightDM]
start-default-seat=false


[XDMCPServer]
enabled=true
port=177
- Install the user desktop environment
test@DESKTOP-B38MLS1:~$ sudo apt install xubuntu-desktop
- Run the lightdm daemon
test@DESKTOP-B38MLS1:~$ sudo service dbus start
test@DESKTOP-B38MLS1:~$ sudo /etc/init.d/lightdm start&
- On the PC with WSL, make the following port configurations in the firewall settings:
UDP Port 177 for remote XDMCP Connections
TCP Port 22 for remote SSH and Secure XDMCP Connections
- Connect with Xmanager using one of the following methods:
Connect to the WSL locally: Enter the localhost in the address bar of Xmanager and hit Enter
Connect Remotely using XDMCP Query: Enter the IP address of the PC with WSL in the address bar of Xmanager and hit Enter
Connect Remotely using Secure XDMCP: Create a Secure XDMCP session file and initialize it

 한국어
한국어